Trials Of The Pharaoh - Light Ray Puzzle Game
An Egyptian light ray puzzle game, made in 10 days for GDTV Jam 2022 with my Vulkan and OpenGL graphics libraries. I worked together with the same people that made The Last Dodo with me.
This is the first project where I have both a Vulkan and an OpenGL executable, this ensures that those with older gpus or outdated drivers will still be able to play (before I had a few people complaing about the game not working for them).
Out of 950 submissions, we managed to get 1st place in both the “fun” and “music” categories, 4th in “Mechanics” and “Sound”, and 5th in “Aesthetics”. Which I am very happy with.
Credits:
-
Mick Cooke – MakeFire Music - Music
-
Thanos Gramosis - Art
-
Paul James – Wafer Audio - Sound
-
Paulina Ramirez – Lady Yami #3939 - Voice Over/Writing
-
Noam Zeise - Programming
Technical Details:
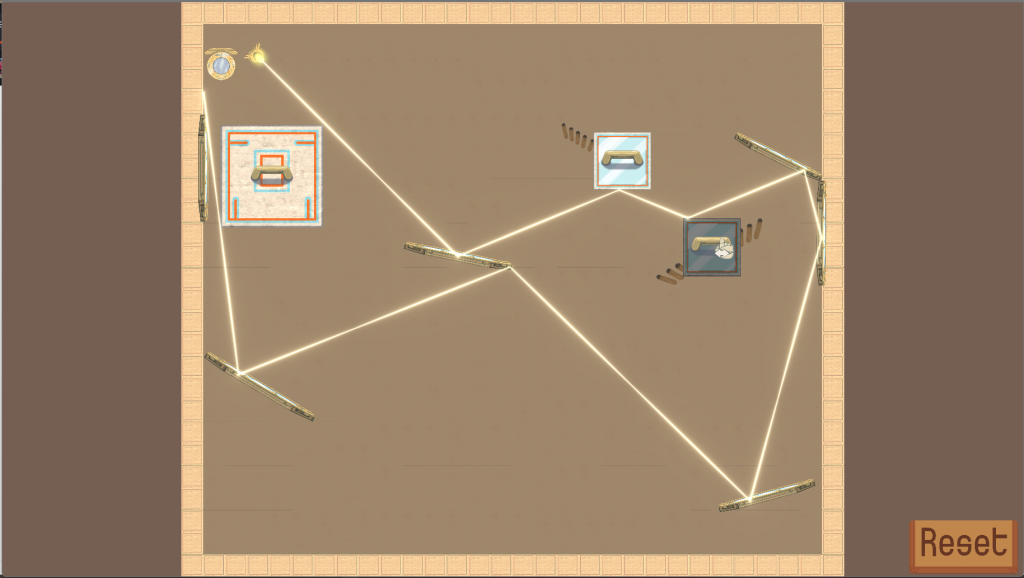
2D Light Ray Shader
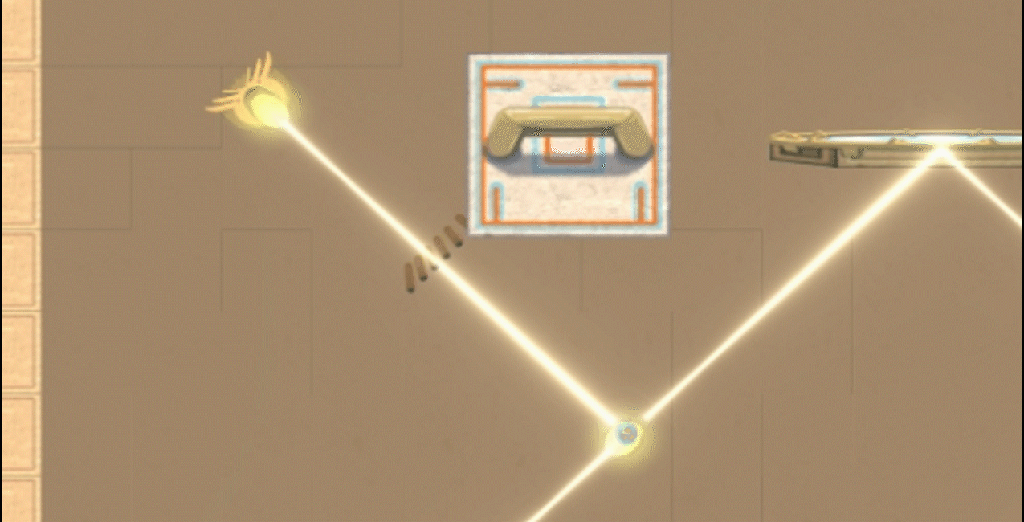
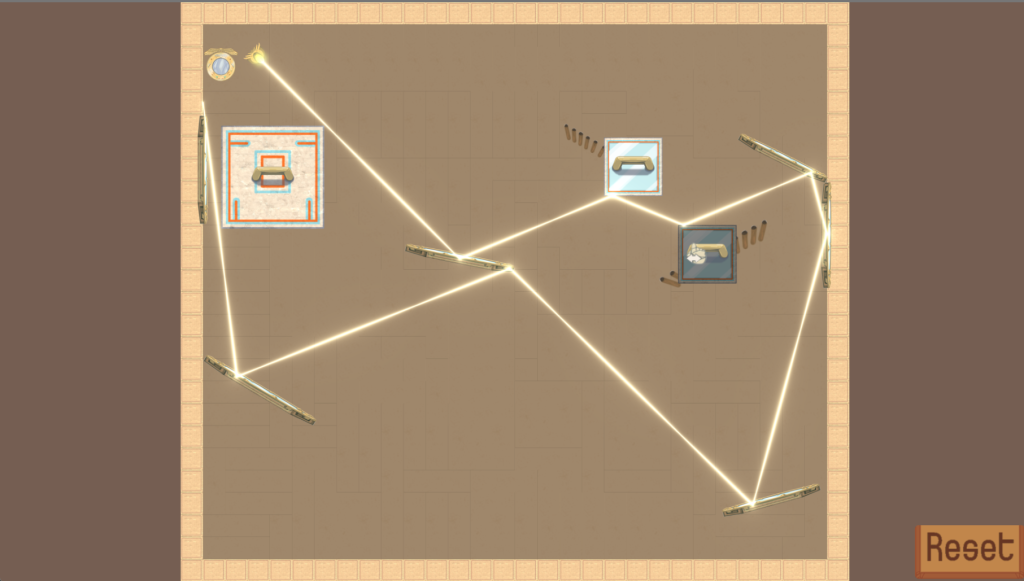
Shaders played a big role in this game, the light ray effect is generated by the fragment shader.
The rays begin from an emitter, and shoot out into the game map. The map is stored as a series of lines, so a square will have 4 lines for example. I step forward by a large amount of units and check each surface to see if the ray intersected any lines, if it did, I roll back the ray to half the previous step and check again. If there was still a collision I go half again back, if not, I go half again forward. This is repeat until the ray is at the desired detail level. If the surface is a mirror, the ray is reflected based on the laws of reflection and I repeat the above steps, until I have a series of start and end points for rays. There is a cutoff of reflections to prevent an infinite loop, and to ensure the shader buffer isn’t exceeded.
The array of start and end points are converted from game coords to screen coords, then sent to a storage buffer on the gpu at the start of the frame. these points are accessed from the fragment shader, which modify the brightness of a pixel based on how close each fragment is to a line. The intensity is also modified by time with a sine function to give the rays a “pulsing” effect in the direction of travel.
The light ray shader takes in an array of pairs of points and a distance that I store in a shader buffer. I calculate the distance on the cpu so that it does not need to be recalculated for each fragment.
const int RAY_COUNT = 100;
layout(set = 4, binding = 0) readonly buffer PerFrameLightPoints{
  vec2 p1;
  vec2 p2;
  float distance;
} rays[RAY_COUNT];
I also send in a time value that I use to produce the wave effect the light has.
layout(location = 2) in float time;
I calculate the value of the fragment by summing the effect of each ray into an attenuation value that I use to modify the colour towards yellow. The closer the fragment is to the line between the two points, the brighter it is.
vec4 col = texture(sampler2D(textures[texID], texSamp), coord) * colour;

float attenuation = 0.0f;
// add to the attenuation the effects of each ray on the fragment
for(int i = 0; i < RAY_COUNT; i++)
{
	//  I set the last ray distance to zero to break the loop early
	if(rays[i].distance == 0)
		break;

	float dist = 0.0f;
	// Get the square distance from the start point to the end point
	vec2 lineVec = (rays[i].p2 - rays[i].p1);
	float l2 = (lineVec.x* lineVec.x) + (lineVec.y*lineVec.y);
	// If the ray has no length, we calculate the distance
	// from the start point to the fragment
	if(l2 == 0.0f)
		dist = distance(rays[i].p1, gl_FragCoord.xy);
	// Otherwise we calc the distance from the fragment
	// and the line between the two points by projecting the
	// fragment onto the line and getting the distance between
	// that point and the fragment pos
	else
	{
		float t = max(0, min(1, dot(gl_FragCoord.xy - rays[i].p1,
			rays[i].p2 - rays[i].p1) / l2));
		vec2 projection = rays[i].p1 + (rays[i].p2 - rays[i].p1)*t;
		float fromStart = distance(rays[i].p1, gl_FragCoord.xy);
		// add a sinusoidal wave effect to the light over time
		float correction = abs(sin(fromStart * 0.01f - time))*0.5f + 0.3f;
		dist = distance(gl_FragCoord.xy, projection) / correction;
	}

	attenuation += 1.0f / (1.0f + 0.3f * dist + 0.05f * dist * dist);
}
// add yellow to the colour based on the effect of the light rays
col += vec4(1.0f, 1.0f, 0.7882352941f, 0.0f) * attenuation;
Vulkan and OpenGL differences
I used preprocessor directives to include either version of the graphics libraries (which have identical outward-facing APIs) (Now I am using volk which means I don’t statically link to vulkan, so I only have 1 binary). This builds two versions of the game, which isn’t ideal in terms of file size, as it adds 1.8MB to the download. The binaries can use the same folders for textures, audio, and other resources (but they both need their own shaders as OpenGL glsl is a little different from Vulkan glsl).
Both versions look almost identical on my hardware:
Vulkan:
OpenGL:
The major difference can be seem in the text, it looks sharper and blockier to me in OpenGL, I expect this is down to the difference in how each rendering pipeline is set up. My Vulkan library draws it’s rendered image to a quad which is then scaled to fit the screen backbuffer. The OpenGL implimentation just directly draws on the screen buffer, modifying the draws to account for the backbuffer size.